The most effective method to Make Your Own Glass Beaded Garden Sparklers
This late spring, convey some bling to your yard with a sun-getting glass-beaded garden sparkler. This fun stylistic layout thing won't just resemble a splendid firecrackers show among your greenery, however its splash of crest will move in the breeze. Essentially, it's unadulterated bliss on a stick. You can get one readymade, yet why do that when you can make your own particular for less and with simple to-discover materials? This task is likewise an awesome approach to repurpose old beaded ensemble adornments you may have or that you stumble over at a thrift shop. Are you game? How about we get sparkly.
(Image: Maya Marin)
Things You'll Need :* A variety of dabs of various shapes and sizes. Ensure a greater part are sparkly (e.g. glass or glass-like, multifaceted) and a decent segment are glossy (e.g. metallic, pearlescent). A lesser measure of translucent gemstone dabs (genuine or false) would likewise look incredible.
* 16 - 20 gage wire, contingent upon how substantial your dots are and how much adaptability you'd like your beaded crest to have.
* Cutting forceps
* Round nose forceps
* 1/2 inch pipe of wanted length (either metal or pvc) or a wine bottle
* Wine stopper
* Utility blade or sharp paring blade
* Industrial paste
* Crimp dots and creasing pincers (discretionary)

(Image: Maya Marin)
Step 1 Your initial step is to cut a bit of wire and set it up for beading. Before cutting, choose what length you'd like your longest "tufts" to be. You'll in the end cut 12 bits of changing lengths with your most limited being around nine inches. I began by making the longest pieces in the first place, and afterward continuously worked towards the most brief pieces. Make sure to leave a 3-inch unbeaded parcel at the base of your tuft. You'll utilize this uncovered wire to append your tuft to the pipe through the wine stopper (canvassed in step 4).

(Image: Maya Marin)
Once you've cut your wire, you'll need to either twist a little circle (utilizing the round nose forceps, as demonstrated as follows) or include a crease dab three creeps from the base to hold the globules over the stem. I've chosen to twist circles in lieu of utilizing crease dots all through this venture. It's a more temperate option, in addition to I think the circles add an enhancing component to the tufts.

(Image: Maya Marin)

(Image: Maya Marin)

(Image: Maya Marin)
Presently comes the fun part - beading! You can either cover the whole length with dabs (take note of this will make your crest heavier and less bouncy), or make holes in the middle of dab groups by utilizing pleat dabs or circling the wire (see third picture underneath). Placing holes in a few or the greater part of your wires will influence your tufts to lighter and additionally enable you to ration globules in the event that you don't have a ton of them. I decided to totally cover a couple of the bigger ones and leave holes in the shorter ones.

(Image: Maya Marin)

(Image: Maya Marin)

Once you're done, secure your dabs on the wire with a little circle toward the end.

(Image: Maya Marin)

(Image: Maya Marin)
Rehash steps 1 and 2 until you've made 12 tufts of fluctuating lengths. 
(Image: Maya Marin)
Step 3
Presently, you'll set up your plug for embeddings on the finish of the pipe as appeared in the arrangement pictures underneath. (On the off chance that you'd get a kick out of the chance to utilize a wine bottle as a stand as opposed to a pipe, see the tip toward the finish of this progression.) If the base portion of your stopper can't be embedded into the pipe as seems to be, utilize an utility blade or paring blade to shave off bit of plug until it's the correct measurement for a cozy fit. Try to just shave the base half, as you'll require a segment of the plug to sit above pipe edge.

(Image: Maya Marin)

(Image: Maya Marin)

(Image: Maya Marin)

(Image: Maya Marin)
Tip
A wine jug would work set up of the pipe in the event that you needn't bother with your sparkler to be exceptionally tall. Essentially connect the stopper safely to the wine bottle opening and skip to the subsequent stage.
Step 4
Utilizing the round nose pincers, embed the base bit of exposed wire of each tuft into the stopper to a profundity of (no less than) one inch.

(Image: Maya Marin)
In case you're experiencing issues embeddings the wire into the plug, utilize a drill or nail to make pilot openings first - yet don't make them too substantial or the stopper won't grasp the wire. In the wake of embeddings the wires into the gaps, fill any holes in the opening with stick.
Rehash for each of the 12 tufts.

(Image: Maya Marin)
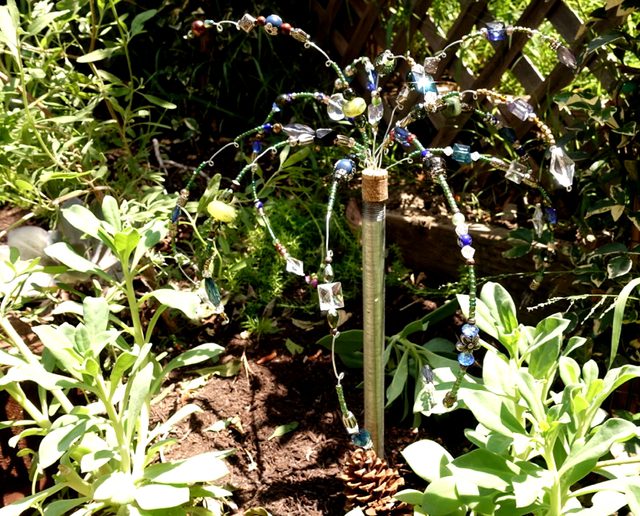
Organize the tufts into your coveted design, and you're amazing creation is prepared to mount!

(Image: Maya Marin)
The mounting materials you requirement for your sparkler rely upon how you'd jump at the chance to show it. On the off chance that your pipe isn't too long nor overwhelming and you have firmly compacted soil, you can stick it straight into the ground - maybe with a few shakes around the base to keep it propped upright.

(Image: Maya Marin)

(Image: Maya Marin)
source:ehow.com by:Maya Marin